wave tucks

wave tucks
Showing posts with label SK Designs Houston. Show all posts

Wednesday, April 1, 2015

20 Year Anniversary - A few of our favorite things!

Spring is definitely in the air this week in Houston, Texas!  As SK Designs celebrates 20 years in business, we would like to share a few of our favorite things with you. Today's post includes 7 of our favorite things!


1)  Fantastic products and vendors with lots of wonderful options to present to my clients to enhance their windows and homes.  These are a few things presented at a recent client meeting: hardware samples in a variety of finishes, along with velvets and silks and nailheads...yummmm!


2)  Having a home based business.  This allows me to work as late or as early as I want or need to, without having to worry about traffic or a long commute.

Also, it allows me to have exciting little moments like this one, where I saw a little bunny in the back yard on the way to my office.


3) Having a business that requires lots of tools to make my job easier and with a better end result.  Also, these tools can be used for other fun things, like making this cow for my backyard.  My dad had made me two of these cows a long time ago, but time and weather had worn them out.  Luckily, dad gave me the template for one of them and I kept myself occupied making this one when my husband was out of town one weekend.

It is fun to watch kids ride their bikes past the house and then back up to point at the cow.


4) Even though I often work during the weekends or start very early in the morning, I love having the flexibility to do things like have lunch with my friend Suzie on a perfect spring afternoon so that we can celebrate our birthdays together.  Suzie gave me these gorgeous tulips which come in a clear glass vase and are almost ready to bloom.  It has been so much fun watching them grow and blossom this wee!  She got them at Kroger and they are made by BlooMaker.  I love them!


5)  Working with lots of gorgeous fabrics and trims!  Below are several fabrics and trims getting ready to be made into a lot of beautiful pillows for a lovely new construction home in Oak Forest.


6)  Participating in neighborhood events.  Last week our area mom's group hosted an outdoor movie night and SK Designs, as a Platinum Sponsor, provided the "box cars" for the kids, complete with license plates, snack trays, steering wheel and front grille.  The kids had fun watching the movie in their cars!


7)  Working on creative projects, such as this one for a sorority house in San Marcos.  I will be creating the sorority crest on the center of the roman shade, using fusible applique techniques and with hand beaded pearl accents.  The leading edges on the drapery panels will have tuck details and pearl accents as well. I can't wait to work on that project (plus a trip to San Marcos to install will be fun too!)

Hope you enjoyed today's post! More of our Favorite Things will be posted soon!

Susan

Friday, July 25, 2014

A Beautiful Bathroom

This gorgeous bathroom belongs to a new client who found SK Designs on Angie's List!  They had recently moved to a beautiful home and were making some design changes, including the window treatment for their master bathroom.  The photo below is the "before" photo.  It shows the barrel ceiling and arched window which had been treated with some light cafe curtains.


The homeowner wanted a treatment that provided some privacy but also matched the drama and scale of the existing bathroom finishes.  She had already purchased a solid grey fabric and a lovely semi-sheer silver/grey fabric and wanted a metal rod similar to those in the attached master bedroom.


As I began to fabricate the treatment, I realized that the sheer fabric looked great on each side and wanted to make sure the client selected her preferred look.  So I sent her a photo showing each side so that she could select which one she liked better.  She selected Option 2, which I liked best also, since it had more contrast and drama.


The fabrics looked great paired together.  She wanted to use the solid fabric for the outer panels and the sheer fabric for the center area.  Below shows the two fabrics and the custom rod, which I modified to add more black to coordinate better with the fabrics.


As you can see in the original photo, there was a lot of available room above the window.  I suggested we use an arched rod to match the ceiling arch and other arched openings in the room, and that we place the new rod to be in proportion to the ceiling height.  The client readily agreed and I went to work!


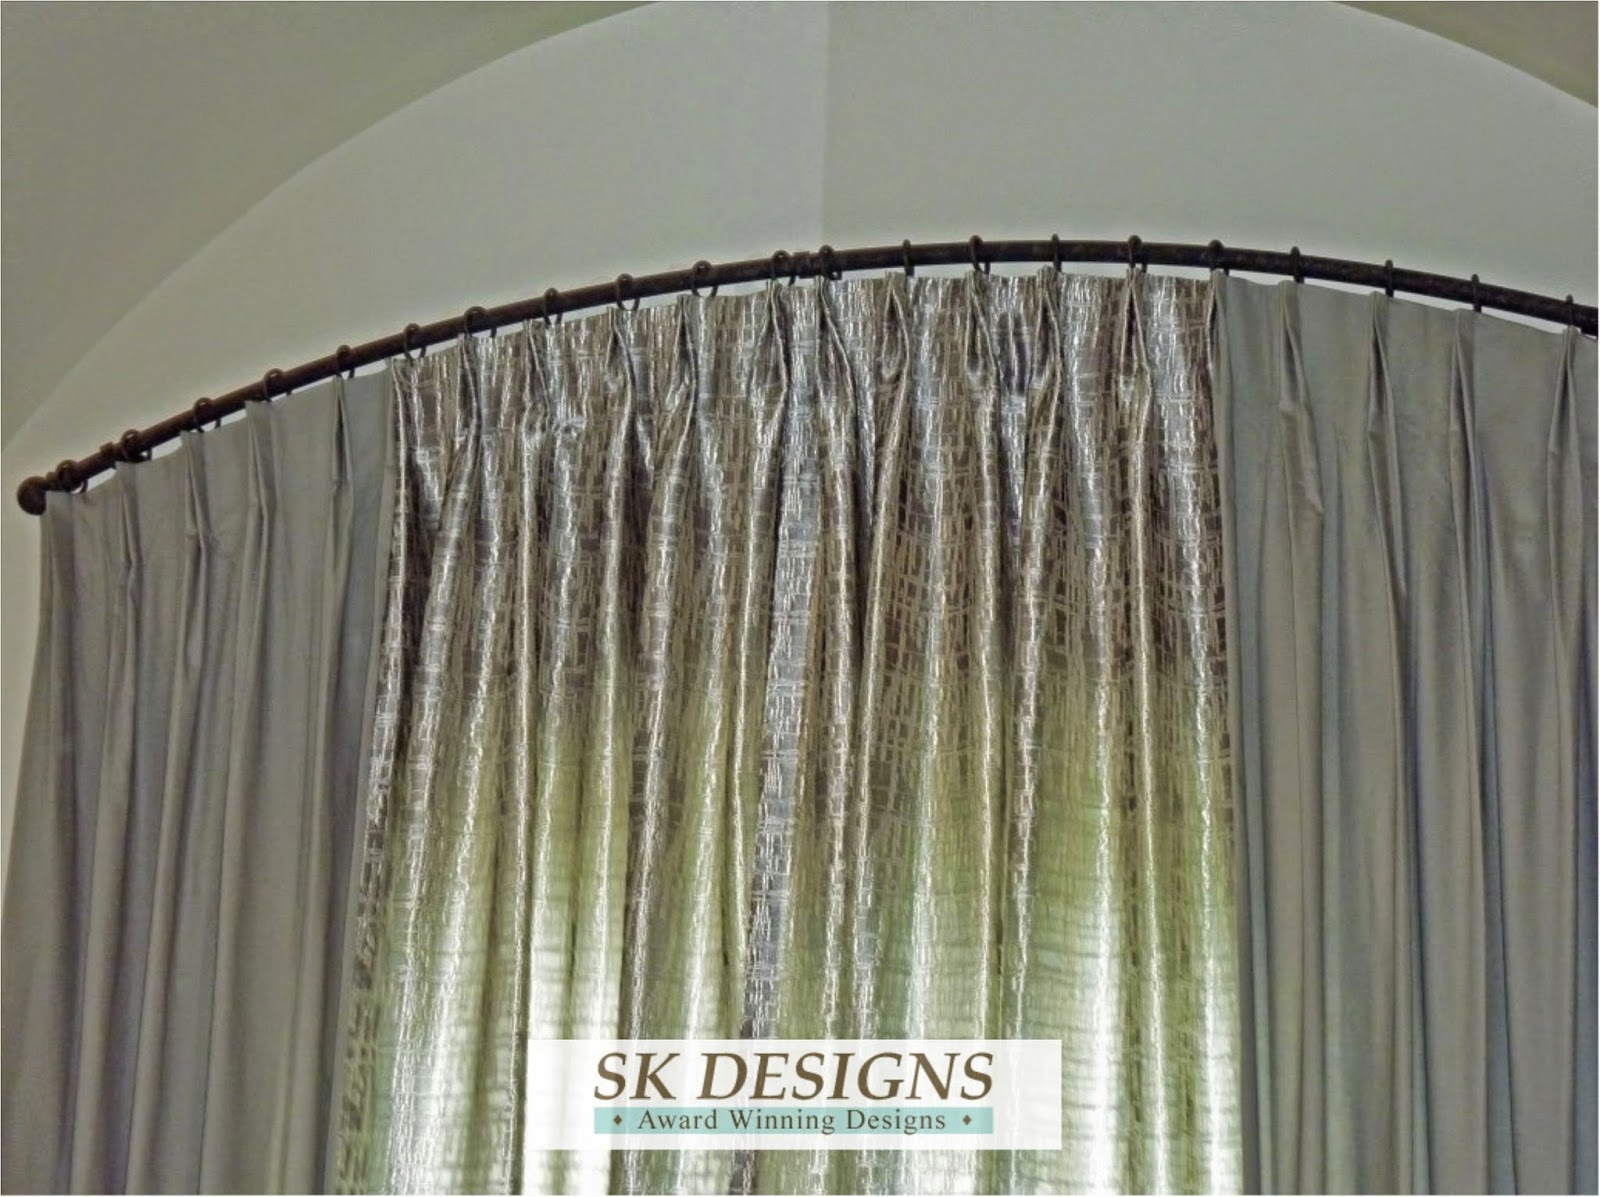
I had the metal rod custom bent to our preferred shape and then I drilled the holes in the top of the rod for the metal "sticky rings".  This allowed me to be very specific in matching the holes/rings to the pleats in the completed panels.  I prefer the "sticky rings" because they have a little spike at the upper inside of the ring, and allow the ring to hang straight with gravity.  It gives me, as a fabricator, more flexibility and accuracy in the workroom, instead of having rings welded into place which can appear a little angled and bulky and don't allow for any adjustments.  These sticky rings are an innovative product by Amore' Drapery Hardware.  In the photo below you can that the revised finish on the ring, to include more black instead of brown, as well as the little spike at the top of the ring which drops into the drilled holes at the top of the rod.


Here is the completed project, which really complements the scale of this beautiful room!  The patterned sheer in the center allows for some filtered light while still providing privacy.


Below is a closer photo of the panels and rod.

And here is my client's own photo of the room at night, which showcases the beautiful sheer even better.  As you can see, we extended the panels about 8" out on each side of the window width, in order to frame the tub perfectly.


The client was really happy with the finished product, which we installed just in time for a party in her new home!

Thanks for reading!

Susan

Thursday, May 1, 2014

*Bright & Fun Girl's Room Project

A couple of months ago I mentioned an upcoming fun project for a little girl's room that I was getting ready to work on.  The fabric and trim selected is so pretty and I was looking forward to working on the combination of trim and fabrics for this project.  We recently installed this and I wanted to share it with you.


Here is a photo of the existing bedding in the room which was our jumping-off point for fabric and trim selection.  Isn't this great? I love the vibrant colors and contrast and I knew it would be easy to find fabrics and trims to coordinate.

After the floral fabric was selected, I found two solid fabrics to coordinate:  a bright orange and a peony color.  The orange would be the lining and the cuff for the valance and the peony color was used for the contrast cording at the heading and as an accent on the pillow.

I found a sassy trim for the valance hem and the pillow accents:


I created two valance renderings for my client to select from; a shaped cornice or a raised valance with finials.  Either treatment would take advantage of the 13" available above the window, and also allow for a sufficient finished length that would cover the existing shade in the window when it was fully raised.


The client selected the soft valance, which was my favorite also!  We ordered the fabric, trim and finials and then the fun began.

The fabric had a large floral motif, which was centered on each swagged section and also on the horns, so that there is a smooth visual flow across the valance.  We also made the valance for the attached bathroom, and I centered a different motif on that valance for contrast and interest, while still providing continuity between the rooms.

Here is the completed bedroom valance:


I used Pate-Meadows finials, which are very reasonably priced and readily available.  I hand painted the cream colored finials and posts, so that they would match the colors in the treatment.

Here is a closeup of the horn and cascade, showcasing the fun trim!


This photo shows the bathroom valance with a different motif centered in the swag sections.  This valance had a finial only at the center, since the shower trim was close to the window, which worked out well for this smaller window also.


And here is a photo of the adorable pillow using all three fabrics and the trim - a perfect complement to the existing bedding!


I hope you enjoyed this project as much as I did!  The client was great to work with and the project was wonderful also.

Hope to see you soon!

Susan

Thursday, March 6, 2014

What's Coming Up!

I believe that people are thinking it is time for Spring decorating, because I am getting a lot of new calls for appointments, which is always fun!

Want a sneak peek at what I will be working on in the upcoming weeks?

Tomorrow I will start working on an inverted pleat shower curtain with contrast buttons and contrast ties for a recently remodeled bathroom in a lovely home that I have completed other work in.  Here is the rendering for the shower curtain and also for the valance.  I love the banding detail on the valance, which will perfectly complement the existing band of tile.  The embroidered fabric is really pretty and picks up the colors in the counter, floor and tile work.  This will be a fun project!


I love the software program that I use for project renderings.  I have recently changed the background (that is shown above) that I use for renderings.  The new one is more of a "storyboard" look and I really like it.  

Using the new format below, a young girl's room project is shown.  What do you think of the storyboard format?

This great project will have a bright and vivid treatment to match her existing orange and bright pink bedding. We will also add a matching valance, scaled to a smaller window, in the bathroom.


Isn't this fabric great?  And I found this wonderful tassel trim with a bead accent for the hem detail. It is going to be so cute!

I will definitely post photos of the completed projects; hope you enjoy the "before" renderings and look forward to seeing the finished projects.

Susan

Thursday, February 6, 2014

Silk Shade with Swoops

I love meeting clients who really know what they want in a window treatment!  The advent of Houzz and Pinterest makes thousands of window treatment ideas readily available to homeowners and makes it easy to select a style or design that they like for their upcoming project.


Project window - before
Last fall, I met with a client who knew exactly what she wanted for her lovely home office in terms of privacy, light control and style, and I was happy to help her select the fabrics and trims to bring those ideas to fruition.

My client knew she wanted a pretty, swooping hemline that looked great from outside.  She also wanted a functioning roman shade that did not "draw in" on the sides in the manner that a casual roman shade has a tendency to do, since it is less structured.

When designing custom window treatments, it is always important to consider how the treatment will look from the outside.  Factors to consider: color of lining, will functional details be seen (rings/cording for roman shades), etc.  Keeping these details in mind helps determine the items that will work best for the project at hand.


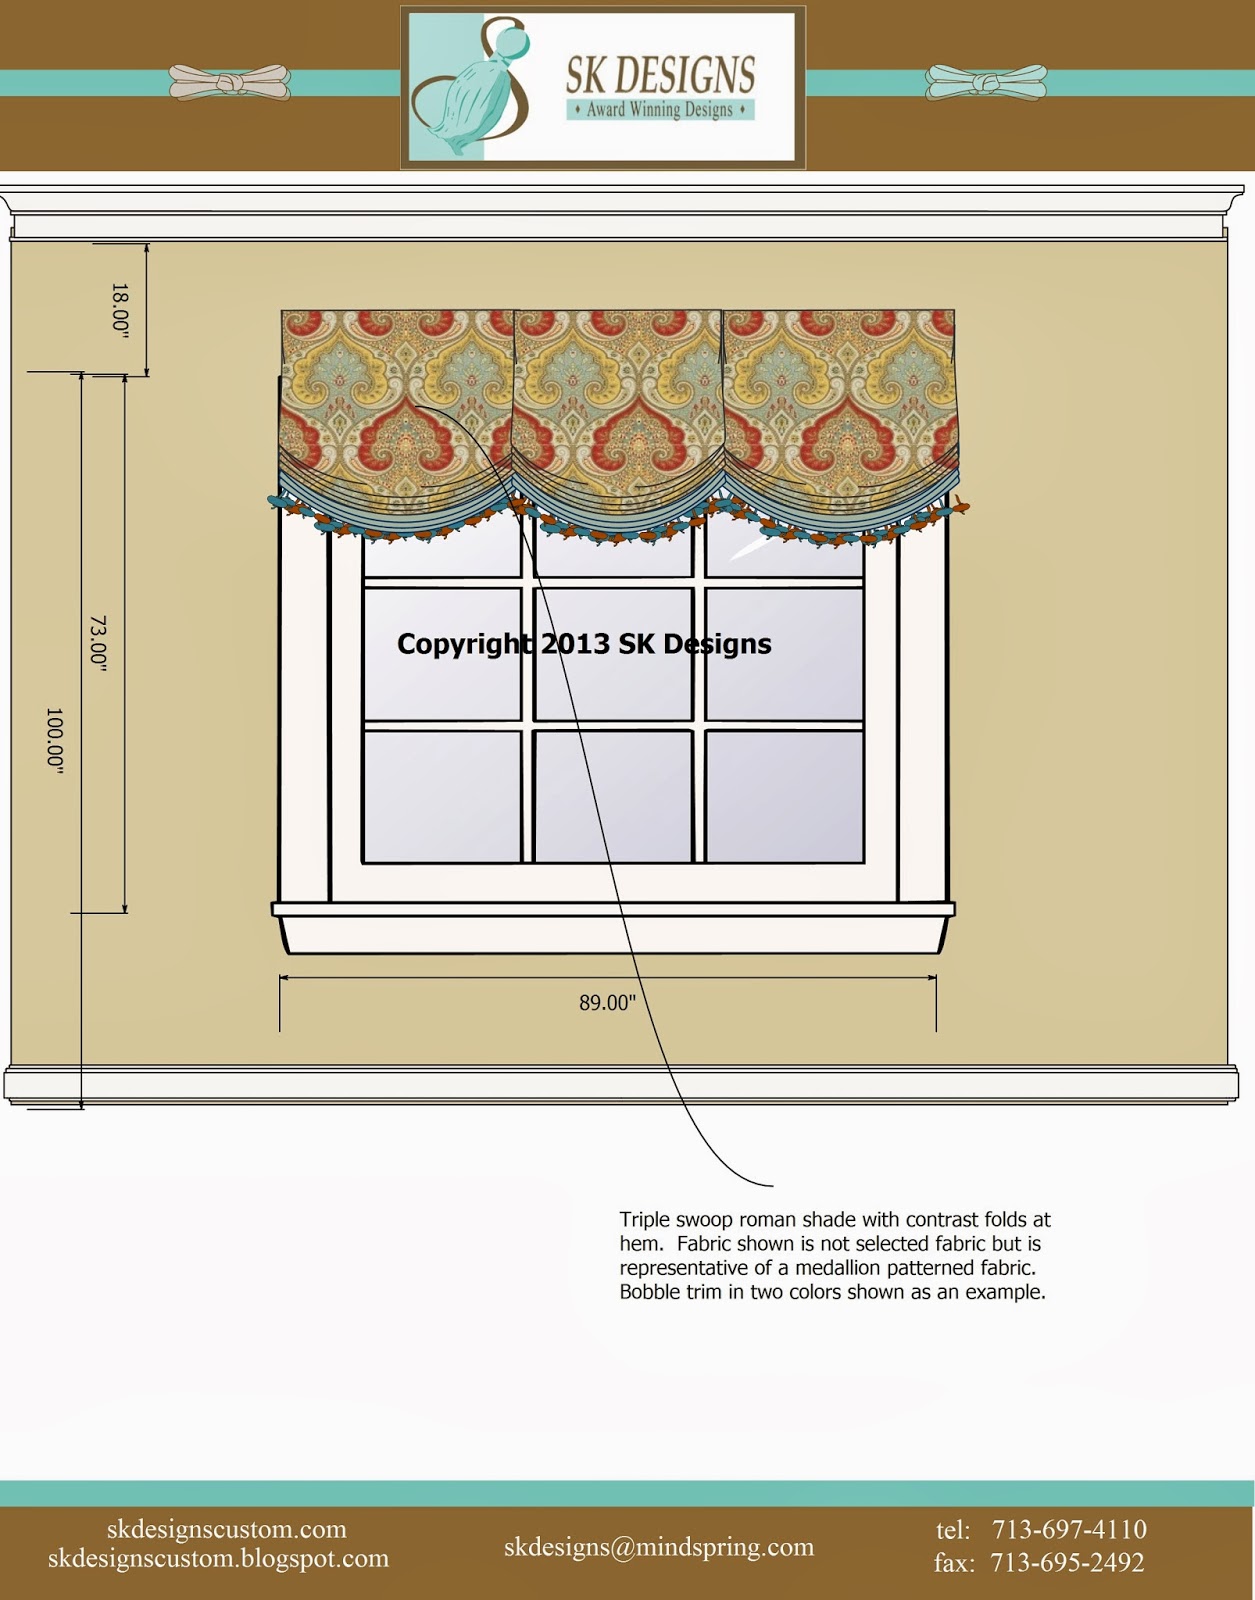
One window was 60" wide, had an arched top and two window breaks, requiring two swoops. The window in this project is 90" wide, with three breaks in the windows, requiring three swoops.  In the photo on the left, the window on the right is our completed project window.


The colors in the room were neutral, allowing us lot of freedom in colors and patterns for the fabric selection.

I created a rendering for the client's approval of the style, before we selected the fabric, when we were considering using a contrast fabric in the permanent hem folds.  Once we selected the fabrics, we decided to use the contrast fabric on the valance so that it was more prominent and visible.


My client loved an embroidered Catania silk fabric with a gorgeous light blue ground with cream, russet and shades of green and yellow.  It is a beautiful fabric!  We added a little whimsy for the valance, using a green and yellow Kravet silk in a small checked pattern.  The valance featured solid russet silk to follow the soft scalloped hem, and the shade hem was accented with a a russet drop bead tassel trim with silver bead accents.  I loved the combination of fabrics and trims!


We selected a pretty polished nickel bead chain (fourth from the top) for the continuous loop cord lift system, in compliance with the safety regulations for corded products.

In order to accomplish the swooped shape at the bottom, but prevent the "drawing in" of the sides of the shades, I cut a trapezoid shape in the silk fabric for the permanent folds at the bottom of the shade.  This provided a wider area at the hem folds, allowing the desired "swooping" and creating a pretty shape for the hem when viewed both inside and outside.

The shade was blackout lined to prevent light bleed through and protect the silk.  Careful consideration was given in selecting the lift system for the shade, due to the large size (90 x 85) and the weight of the fabrics.  I checked with the fabric vendors to obtain the weights of the silk and the blackout lining to make sure the finished shade weight would be within the weight limits allowing the shade to function properly.


Here is a closeup photo of the details and fabrics - so pretty!  


We had a bit of fabric remaining, so we added a couple of "picture frame" style pillows for the sofa - perfect!  The silk center was accented with the russet microcord, providing a counterpoint to the checked fabric background.  The russet silk was also used for a small flat flange around the edges, with three little pleats at each corner.


Hope you enjoyed this project as much as I did!

Susan


Monday, January 20, 2014

Soutache Embellished Window Treatment Project

This is one of my all-time favorite projects and I hope you enjoy it too!  You will hear about this project, and be introduced to my new obsession...soutache embellishment!  As a bonus, I will share the soutache source I am using.  I love her company name as well as her soutache trim.
 

Here is the story...

In November, I received a phone call from a new potential client.  She was really hoping to have new window treatments installed before the end of the year and knew that might not be possible with the holiday project rush.  I told her that I had room on my project calendar for one more window treatment project..if we met and decided on everything quickly and if the fabrics and hardware were readily available.

We met a couple of days later and she graciously gave me the Grand Tour of her home, so that I could see her home's style, colors, and all of the recent home improvements that they had completed.  We then settled into her dining room and began looking at treatment styles for her dining room.  I will post about the dining room later; it was a beautiful and fun project also. You will have to wait to see that one!

Today's blog post is about her family room.  Existing wood blinds would remain for privacy and light blocking purposes, but we would replace her existing panels and valance with something more in keeping with the warm Tuscan colors and fabrics in the family room. 

As a window treatment designer and fabricator, there are always some treatment styles that I am excited for a client to select and that I look forward to fabricating.  This client selected designs with an eye for lyrical embellishments and accents, as well as beautiful fabrics and hardware.  I was getting goosebumps (and am getting them again right now as I write this!) when she made her selections.  I love that!  

Available at Amazon.com
She selected a great treatment design from Jackie Von Tobel's Design Directory of Window Treatments.  This book is a true treasure with hundreds of great ideas that appeal to clients and help spark creativity.  I was so excited when she chose her design, and even more excited when she selected her fabrics.

Here is the treatment that she selected, which I have imported using her actual window area measurements and fabrics and colors that she selected.


The draperies and swags would be made in a gorgeous iridescent silk paisley from Catania Silks. The fabric colors are warm: russet, gold and an olive green.  It is so pretty!  The banners would be in a solid gold silk, banded in solid olive green silk - perfect!  We would add a pretty multicolored tassel at the points of each banner.   Dark wood rods, brackets and finials would complete the look and coordinate well with the other wood furnishings in the room.

Luckily, all of the fabrics, trims and hardware were in stock and ready to ship!  That meant that the pressure to complete the project would be all on me...no material delays would compromise the desired installation date.

We still needed to determine what the banner embellishment would be. We considered embroidery or applique and wanted to make sure we did not repeat the design or embellishment method that we were going to use in the living room (Celtic banding and microcording).  I sent her several ideas of shapes to consider, and we agreed on a beautiful scrolling design, to be created using olive green soutache.  

Below is the design rendered on paper and taped to my office window, ready to trace onto the fabric.  The proportions were just perfect:  about 7 inches wide x 10 inches tall.  The scrollwork was similar enough to some fleur de lis motifs in the home, but no too repetitive.


Are you familiar with soutache?  It is a narrow braid, usually about 1/8" wide, that is used for embellishing garments, and, historically, military uniforms.  It is available in dozens of colors and is very flexible, which makes it curve beautifully in a variety of shapes and angles.

I bought my soutache from Amee Runs With Scissors at www.ameerunswithscissors.com. She sells the soutache by the yard, as well as sample kits of the colors that are available, as shown below.
Amee Runs With Scissors sample kit

I am becoming obsessed with soutache!  If you are on Pinterest, you will notice that there are tons of photos of jewelry made with soutache, which is the hottest thing right now.  But I will stick with using the soutache for window treatment and pillow embellishments!

Below is a photo of the silk pennant fabric, stabilized with an iron on stabilizer from Rowley Company, and with the pattern traced and soutache embellishment in progress.


I have found that the most precise way to attach the soutache is to use a fabric adhesive very minimally, as a basting method.  After tracing the design on the fabric, I put a small amount of fabric adhesive on a paper plate.  Using a straight pin, I dipped the tip of the pin into the adhesive, and then placed tiny dots of adhesive along the traced line.  

Below, you can see a line of adhesive dots, awaiting the application of the soutache.  The soutache is pinned carefully in place while working in small sections and allowed to dry.  

Now it is time to hand sew the soutache into place.  I am not fast at hand sewing, and soutache application is not a process to be rushed!  Each design took me about 3 hours from start to finish, for the design and application part only (not the stabilizing or sewing).


I think the time is well invested!  Here is a closeup of the completed design on the banded pennant.


Back to the project:  below is a photo of the project as it is being installed.  The outer two swags were mounted first, and then the brackets for the center raised swag and outer pennants are installed.  The stationary panels were attached and then the pennants, attached to the rods, are placed in the brackets.  


Are you ready?  Now?  Ready yet?

Here is the completed treatment!


A lot of planning went into this project.  The size and proportions of the banners and their banding, as well as the size of the underswags and smaller raised swag and their relation to each other were all considered.  Additionally, I did not want the soutache embellishment to overtake the treatment.  I think the size of the design works perfectly, allowing some open "relief" area around it and accenting the olive green banding. The swags cover the headrail on the existing blinds, and the solid fabrics complement the silk paisley fabric beautifully.

It was a fun project and the client was a delight to work with and she was thrilled with her completed project!  Thank you, Sherri, for the opportunity to work with you!  Next up, her dining room project featuring banding, microcording, Celtic applique, gorgeous silk taffeta (appropriately named Creme Fraiche) and a decorative rod with a center cartouche!  You will have to wait for the next post to hear all about that project :).

Hope you enjoyed this project as much as I did!

Susan